SSM 框架整合
Spring+SpringMVC+MyBatis 框架整合
1. 创建 maven 项目
创建一个 maven 项目,在 pom.xml 文件中导入相关包基本包有:
- mysql 连接驱动 jar
- mybatis 的 jar
- mybatis 与 spring 整合的 jar
- spring 相关 jar
- springmvc 的 jar
项目中会用到的日志记录包: - log4j 的 jar
- slf4j 的接口 jar
- slf4j 和 log4j 的整合 jar
项目中会用到的单元测试包: - junit 的 jar
可能会用到 jsp 时需要的包: - servlet 的 jar
- servlet-jsp 的 jar
- jstl 标签支持的 jar
2. 创建项目结构
- 项目
- pom.xml
- src
- test
- main
- java
- entity
- dao
- service
- impl
- controller
- util
- resources
- mapper
- mapper.xml
- jdbc.properties
- mybatis-config.xml
- applicationContext.xml
- springmvc.xml
- log4j.properties
- mapper
- webapp
- WEB-INF
- web.xml
- index.jsp
- index.html
- WEB-INF
- java
3. 配置各个框架的配置文件
配置 web.xml
1
2
3
4
5
6
7
8
9
10
11
12
13
14
15
16
17
18
19
20
21
22
23
24
25
26
27
28
29
30
31
32
33
34
35
36
37
38
39
40
41
42
43
44
45
46
47
48
49
50
51
52
53
54
55
56
57
58
59
60
61
62
63
64
65
66
67
68
69
<web-app
xmlns="http://xmlns.jcp.org/xml/ns/javaee"
xmlns:xsi="http://www.w3.org/2001/XMLSchema-instance"
xsi:schemaLocation="http://xmlns.jcp.org/xml/ns/javaee
http://xmlns.jcp.org/xml/ns/javaee/web-app_3_1.xsd"
id="WebApp_ID"
version="3.1"
>
<!--<display-name>ssmdemo</display-name>
<welcome-file-list>
<welcome-file>index.jsp</welcome-file>
<welcome-file>index.html</welcome-file>
</welcome-file-list>-->
<!-- 加载spring的ApplicationContext容器 -->
<context-param>
<!-- 加载src目录下的 applicationContext.xml文件-->
<param-name>contextConfigLocation</param-name>
<param-value>classpath:applicationContext.xml</param-value>
</context-param>
<!--Spring中的监听器,可以在启动项目时自动装配spring的配置文件-->
<listener>
<listener-class>
org.springframework.web.context.ContextLoaderListener
</listener-class>
</listener>
<!-- 加载springmvc的 DispatcherServlet (请求分发器)-->
<servlet>
<servlet-name>springmvc</servlet-name>
<servlet-class
>org.springframework.web.servlet.DispatcherServlet</servlet-class
>
<!-- 需要加载的springmvc-servlet.xml配置文件 -->
<init-param>
<param-name>contextConfigLocation</param-name>
<param-value>classpath:springmvc-servlet.xml</param-value>
</init-param>
<!-- 表示容器再启动时立即加载servlet -->
<load-on-startup>1</load-on-startup>
</servlet>
<servlet-mapping>
<servlet-name>springmvc</servlet-name>
<!-- 处理*.do的URL -->
<url-pattern>*.do</url-pattern>
</servlet-mapping>
<!--配置过滤器,解决请求乱码问题-->
<filter>
<filter-name>encodingFilter</filter-name>
<filter-class
>org.springframework.web.filter.CharacterEncodingFilter</filter-class
>
<init-param>
<param-name>encoding</param-name>
<param-value>UTF-8</param-value>
</init-param>
<init-param>
<param-name>forceEncoding</param-name>
<param-value>true</param-value>
</init-param>
</filter>
<filter-mapping>
<filter-name>encodingFilter</filter-name>
<url-pattern>/*</url-pattern
><!--拦截所有请求,过滤乱码-->
</filter-mapping>
</web-app>- 配置 spring 监听器来创建容器,加载 spring 配置文件
- 配置 springmvc 分发器,加载 springmvc 配置文件
- 配置过滤器,解决乱码
applicationContext.xml
1
2
3
4
5
6
7
8
9
10
11
12
13
14
15
16
17
18
19
20
21
22
23
24
25
26
27
28
29
30
31
32
33
34
35
36
37
38
39
40
41
42
43
44
45
46
47
48
49
50
51
52
53
54
55
56
57
58
59
60
61
62
63
64
65
66
67
68
<beans
xmlns="http://www.springframework.org/schema/beans"
xmlns:xsi="http://www.w3.org/2001/XMLSchema-instance"
xmlns:context="http://www.springframework.org/schema/context"
xmlns:tx="http://www.springframework.org/schema/tx"
xmlns:aop="http://www.springframework.org/schema/aop"
xsi:schemaLocation="http://www.springframework.org/schema/beans
http://www.springframework.org/schema/beans/spring-beans.xsd
http://www.springframework.org/schema/context
http://www.springframework.org/schema/context/spring-context.xsd http://www.springframework.org/schema/tx http://www.springframework.org/schema/tx/spring-tx.xsd http://www.springframework.org/schema/aop http://www.springframework.org/schema/aop/spring-aop.xsd"
>
<!--<!–开启注解扫描–>
<context:component-scan base-package="com.ycj"/>
<!–注解配置–>
<context:annotation-config/>-->
<!--引入数据库properties文件-->
<context:property-placeholder
location="classpath:jdbc.properties"
></context:property-placeholder>
<!--<!–配置数据源–>
<bean id="dataSource" class="org.springframework.jdbc.datasource.DriverManagerDataSource">
<property name="driverClassName" value="com.mysql.jdbc.Driver"></property>
<property name="url" value="jdbc:mysql://localhost:3306/ssmdemo?characterEncoding=utf8"></property>
<property name="username" value="root"></property>
<property name="password" value="123456"></property>
</bean>-->
<bean
id="dataSource"
class="org.springframework.jdbc.datasource.DriverManagerDataSource"
>
<property name="driverClassName" value="${driver}"></property>
<property name="url" value="${url}"></property>
<property name="username" value="${username}"></property>
<property name="password" value="${pwd}"></property>
</bean>
<!--配置spring整合mybatis的工厂类对象-->
<bean
id="sqlSessionFactory"
class="org.mybatis.spring.SqlSessionFactoryBean"
>
<property name="dataSource" ref="dataSource" />
<property name="typeAliasesPackage" value="com.ycj.entity" />
<property name="mapperLocations" value="classpath:mapper/*.xml" />
</bean>
<!--扫描Dao接口,装配mapper.xml-->
<bean class="org.mybatis.spring.mapper.MapperScannerConfigurer">
<property name="basePackage" value="com.ycj.dao" />
<property name="sqlSessionFactoryBeanName" value="sqlSessionFactory" />
</bean>
<!--指定需要扫描的包,使注解生效,dao包在上面已经扫描, 不需要了-->
<context:component-scan base-package="com.ycj.service" />
<!--事务管理-->
<bean
id="txManager"
class="org.springframework.jdbc.datasource.DataSourceTransactionManager"
>
<!--注入DataSource-->
<property name="dataSource" ref="dataSource" />
</bean>
<!--开启事务注解扫描-->
<tx:annotation-driven transaction-manager="txManager" />
</beans>- 配置 mysql 数据源
- 配置 spring-mybatis 整合工厂类对象
- 加载数据源
- 扫描实体包
- 扫描 mapper.xml 文件
- 配置 mapper 注入工厂
- 扫描 dao 层包
- 加载 spring-mybatis 整合工厂类对象
- 扫描有注解的包,使注解生效
- 开启事务管理
- 开启事务管理注解扫描
配置 springmvc-servlet
1
2
3
4
5
6
7
8
9
10
11
12
13
14
15
16
17
18
19
<beans
xmlns="http://www.springframework.org/schema/beans"
xmlns:xsi="http://www.w3.org/2001/XMLSchema-instance"
xmlns:mvc="http://www.springframework.org/schema/mvc"
xmlns:p="http://www.springframework.org/schema/p"
xmlns:context="http://www.springframework.org/schema/context"
xsi:schemaLocation="http://www.springframework.org/schema/beans
http://www.springframework.org/schema/beans/spring-beans.xsd
http://www.springframework.org/schema/context
http://www.springframework.org/schema/context/spring-context.xsd
http://www.springframework.org/schema/mvc
http://www.springframework.org/schema/mvc/spring-mvc.xsd"
>
<!--配置spring创建I容器时要扫描的包-->
<context:component-scan base-package="com.ycj.controller"/>
<!--开启注解驱动-->
<mvc:annotation-driven
/></beans>1
2
3
4
5
6<!-- 配置Spring MVC的视图解析器 -->
<bean id="internalResourceViewResolver" class="org.springframework.web.servlet.view.InternalResourceViewResolver">
<!-- 有时我们需要访问JSP页面,可理解为在控制器controller的返回值加前缀和后缀,变成一个可用的URL地址 -->
<property name="prefix" value="/WEB-INF/jsp/"/>
<property name="suffix" value=".jsp"/>
</bean>- 扫描控制器包
- 开启注解驱动
- 配置视图解析器
包版本参考:
1 | <!--spring版本--> |
4. 错误记录
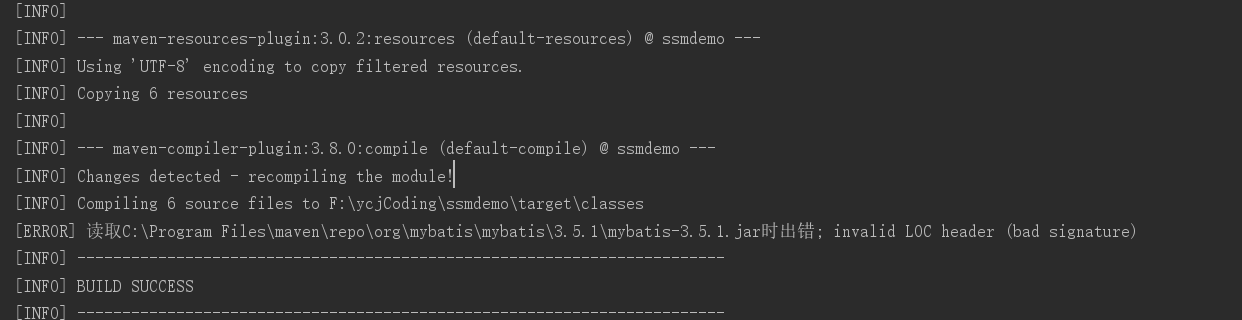
错误 1:
tomcat 报错 org.apache.tomcat.util.modeler.BaseModelMBean.invoke Exception invoking method manageApp
解决方案:
检查 maven 包是否正确,clean->compile
进入 maven 仓库删除相应包, 重新下载
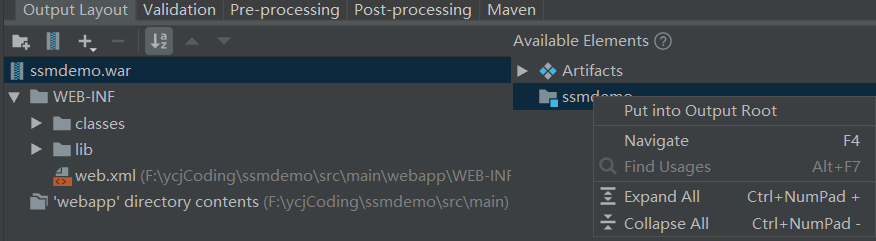
错误 2:
java.lang.ClassNotFoundException: org.springframework.web.context.ContextLoaderListener
解决方案:
项目包中存在,打开项目结构,在 artifacts,将可选项添加到输出文件中,可以看到 WEB-INF 中多了一个 lib 文件,存放依赖的包. 找到原因,没有将项目中的包添加到输出 war 中
错误 3:
无法接收 json 数据
解决方案:
spring5 以上版本不需要在参数前添加@RequestBody,删除注解后成功
错误 4:
无法返回 json 格式数据
解决方案:
配置 json 转换器,需要正确的包(参考 spring5.1.5;fastjson2.9.8)
spring5.0 以上版本,只要开启注解驱动即可<mvc:annotation-driven />